The Migration Engine lets you securely move your complete Havenlytics website to another Havenlytics installation, while keeping all your supported data and relationships intact. Instead of rebuilding your site by hand, you export everything into one portable package, then import it on the destination site.
Download Demo Migration Package
Want to explore Havenlytics without creating properties manually?
Download our official demo migration package and import it into a fresh Havenlytics installation. The package includes sample properties, agents, agencies, taxonomies, media, and demo content to help you get started quickly.
Download
📦 Download Havenlytics Demo Migration Package.zip
After Download
- Open Havenlytics → Settings → Migration
- Go to Import Havenlytics Package
- Upload the downloaded ZIP file
- Validate the package
- Start the import
- Review the Final Report
💡 Note: This demo package is intended for testing and demonstration purposes. Import it into a fresh website or staging environment.
Use the Migration Engine when you need to:
- Move your Havenlytics site to a new host or domain
- Copy a staging site to production, or the other way around
- Set up a second Havenlytics site with the same properties, agents, agencies, and Property Builder layouts
- Create a migration package before moving your website or making significant changes.
The Migration Engine moves data between two Havenlytics sites. If you’re bringing in a spreadsheet or an export from another real estate plugin, use Import / Export instead.
💡 Tip: Think of the Migration Engine as “move my complete Havenlytics website,” and Import / Export as “bring in this spreadsheet.”
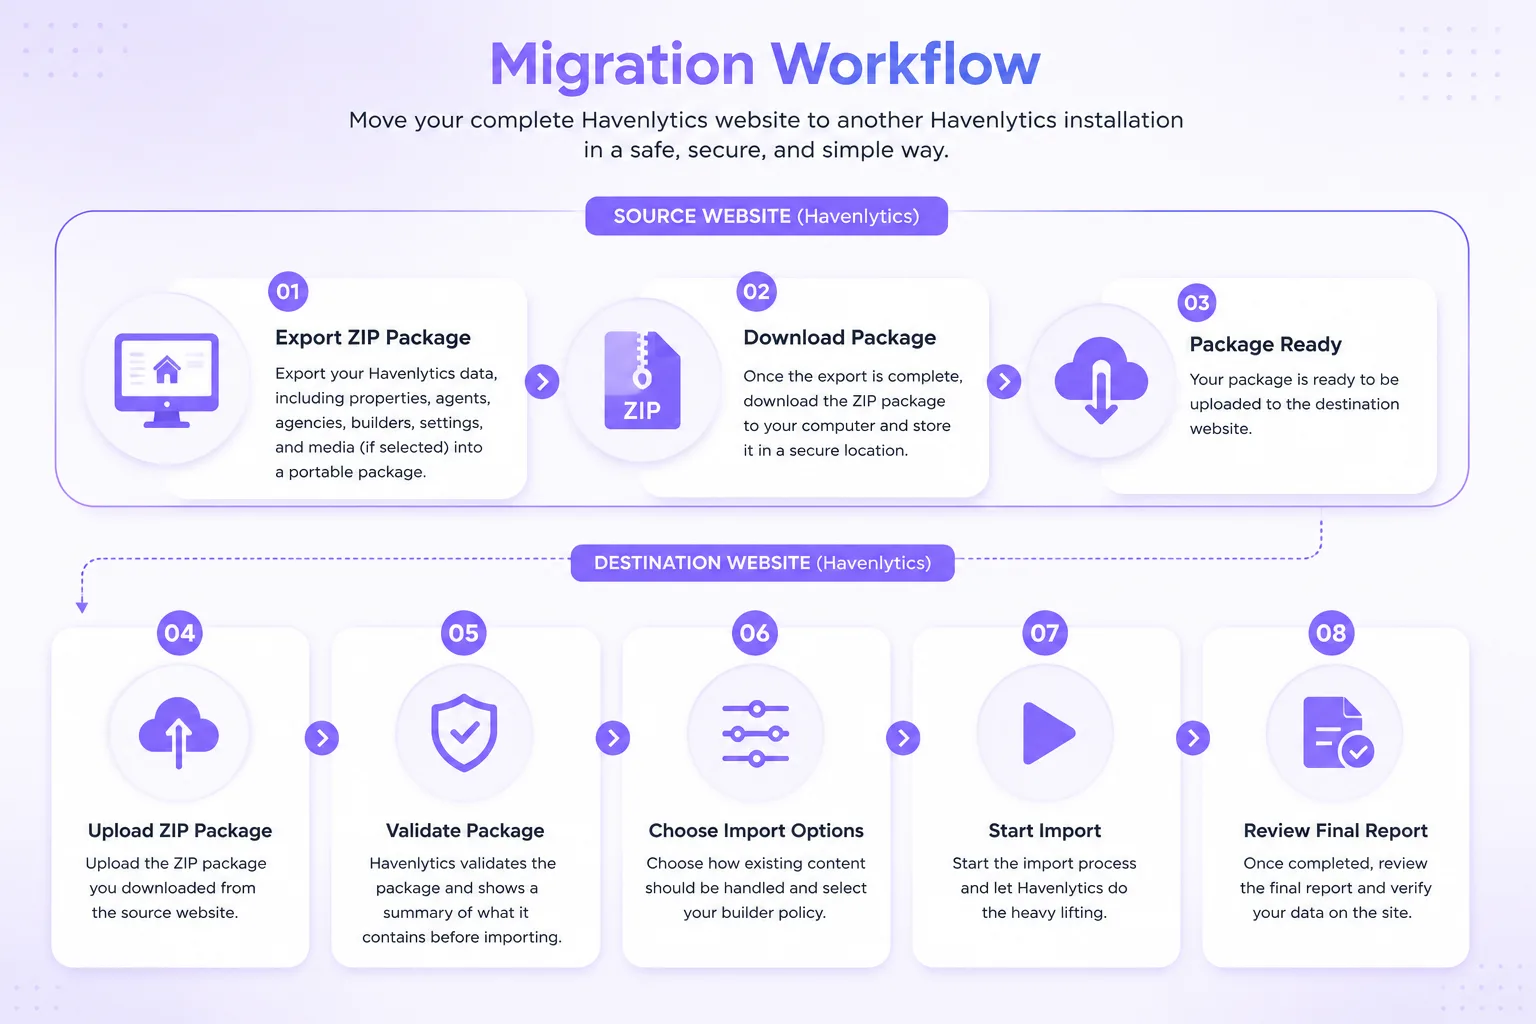
Review Final Report
The Migration Engine follows a simple export-and-import workflow. Export a ZIP package from your source website, then upload and import it into another Havenlytics website.
What Gets Migrated?
Depending on your export options, the Migration Engine can transfer:
✅ Properties
✅ Agents
✅ Agencies
✅ Property Builder layouts
✅ Property Card Builder layouts
✅ Property taxonomies
✅ Property metadata
✅ Images and media (optional)
✅ Documents and videos (if included)
✅ Plugin settings (when selected)
What Isn’t Migrated?
The Migration Engine transfers Havenlytics data only.
It does not migrate:
❌ WordPress users
❌ Themes
❌ Plugins
❌ Elementor templates
❌ Menus
❌ Widgets
❌ WooCommerce data
❌ Third-party plugin settings
These should be migrated separately using your preferred WordPress migration or backup solution.
When Should I Use the Migration Engine?
Use Migration if you want to:
- Move a Havenlytics website to a new domain.
- Transfer a staging website to production.
- Copy a complete Havenlytics website.
- Duplicate an existing website for another client.
- Move all supported Havenlytics data without rebuilding it manually.
Do not use Migration if you only want to:
- Import a spreadsheet.
- Import listings from Excel.
- Import data from Google Sheets.
- Import a CSV from another plugin.
For these tasks, use Import / Export instead.
Before You Begin
- You’ll need administrator access on both the source site and the destination site.
- Havenlytics must be installed and active on both sites.
- Make sure your server has enough free space, especially if your package will include media (photos and files).
- Keep the browser tab open while a job is running — export and import jobs run in stages, and refreshing the page will simply resume the active job.
- Decide in advance how you want duplicate content handled on the destination site.
⚠ Warning: Only import a package you exported yourself, or one from a source you fully trust.
Free Version Limit
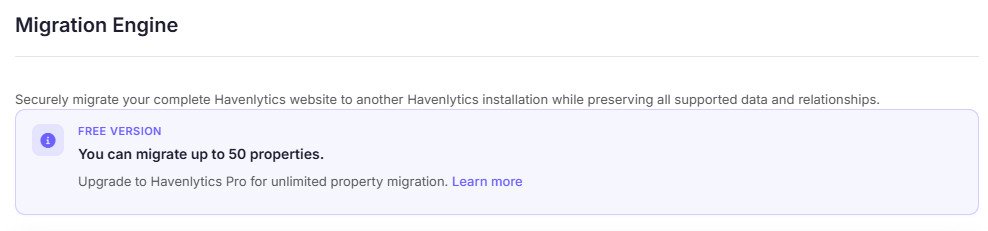
On the free version of Havenlytics, you can migrate up to 50 properties. If your site has more than 50 properties, export will be blocked until you reduce your listings or upgrade. This same limit applies when importing a package into a free site.
Upgrade to Havenlytics Pro for unlimited property migration. Learn more
Step-by-Step Guide
Step 1: Export Your Havenlytics Package
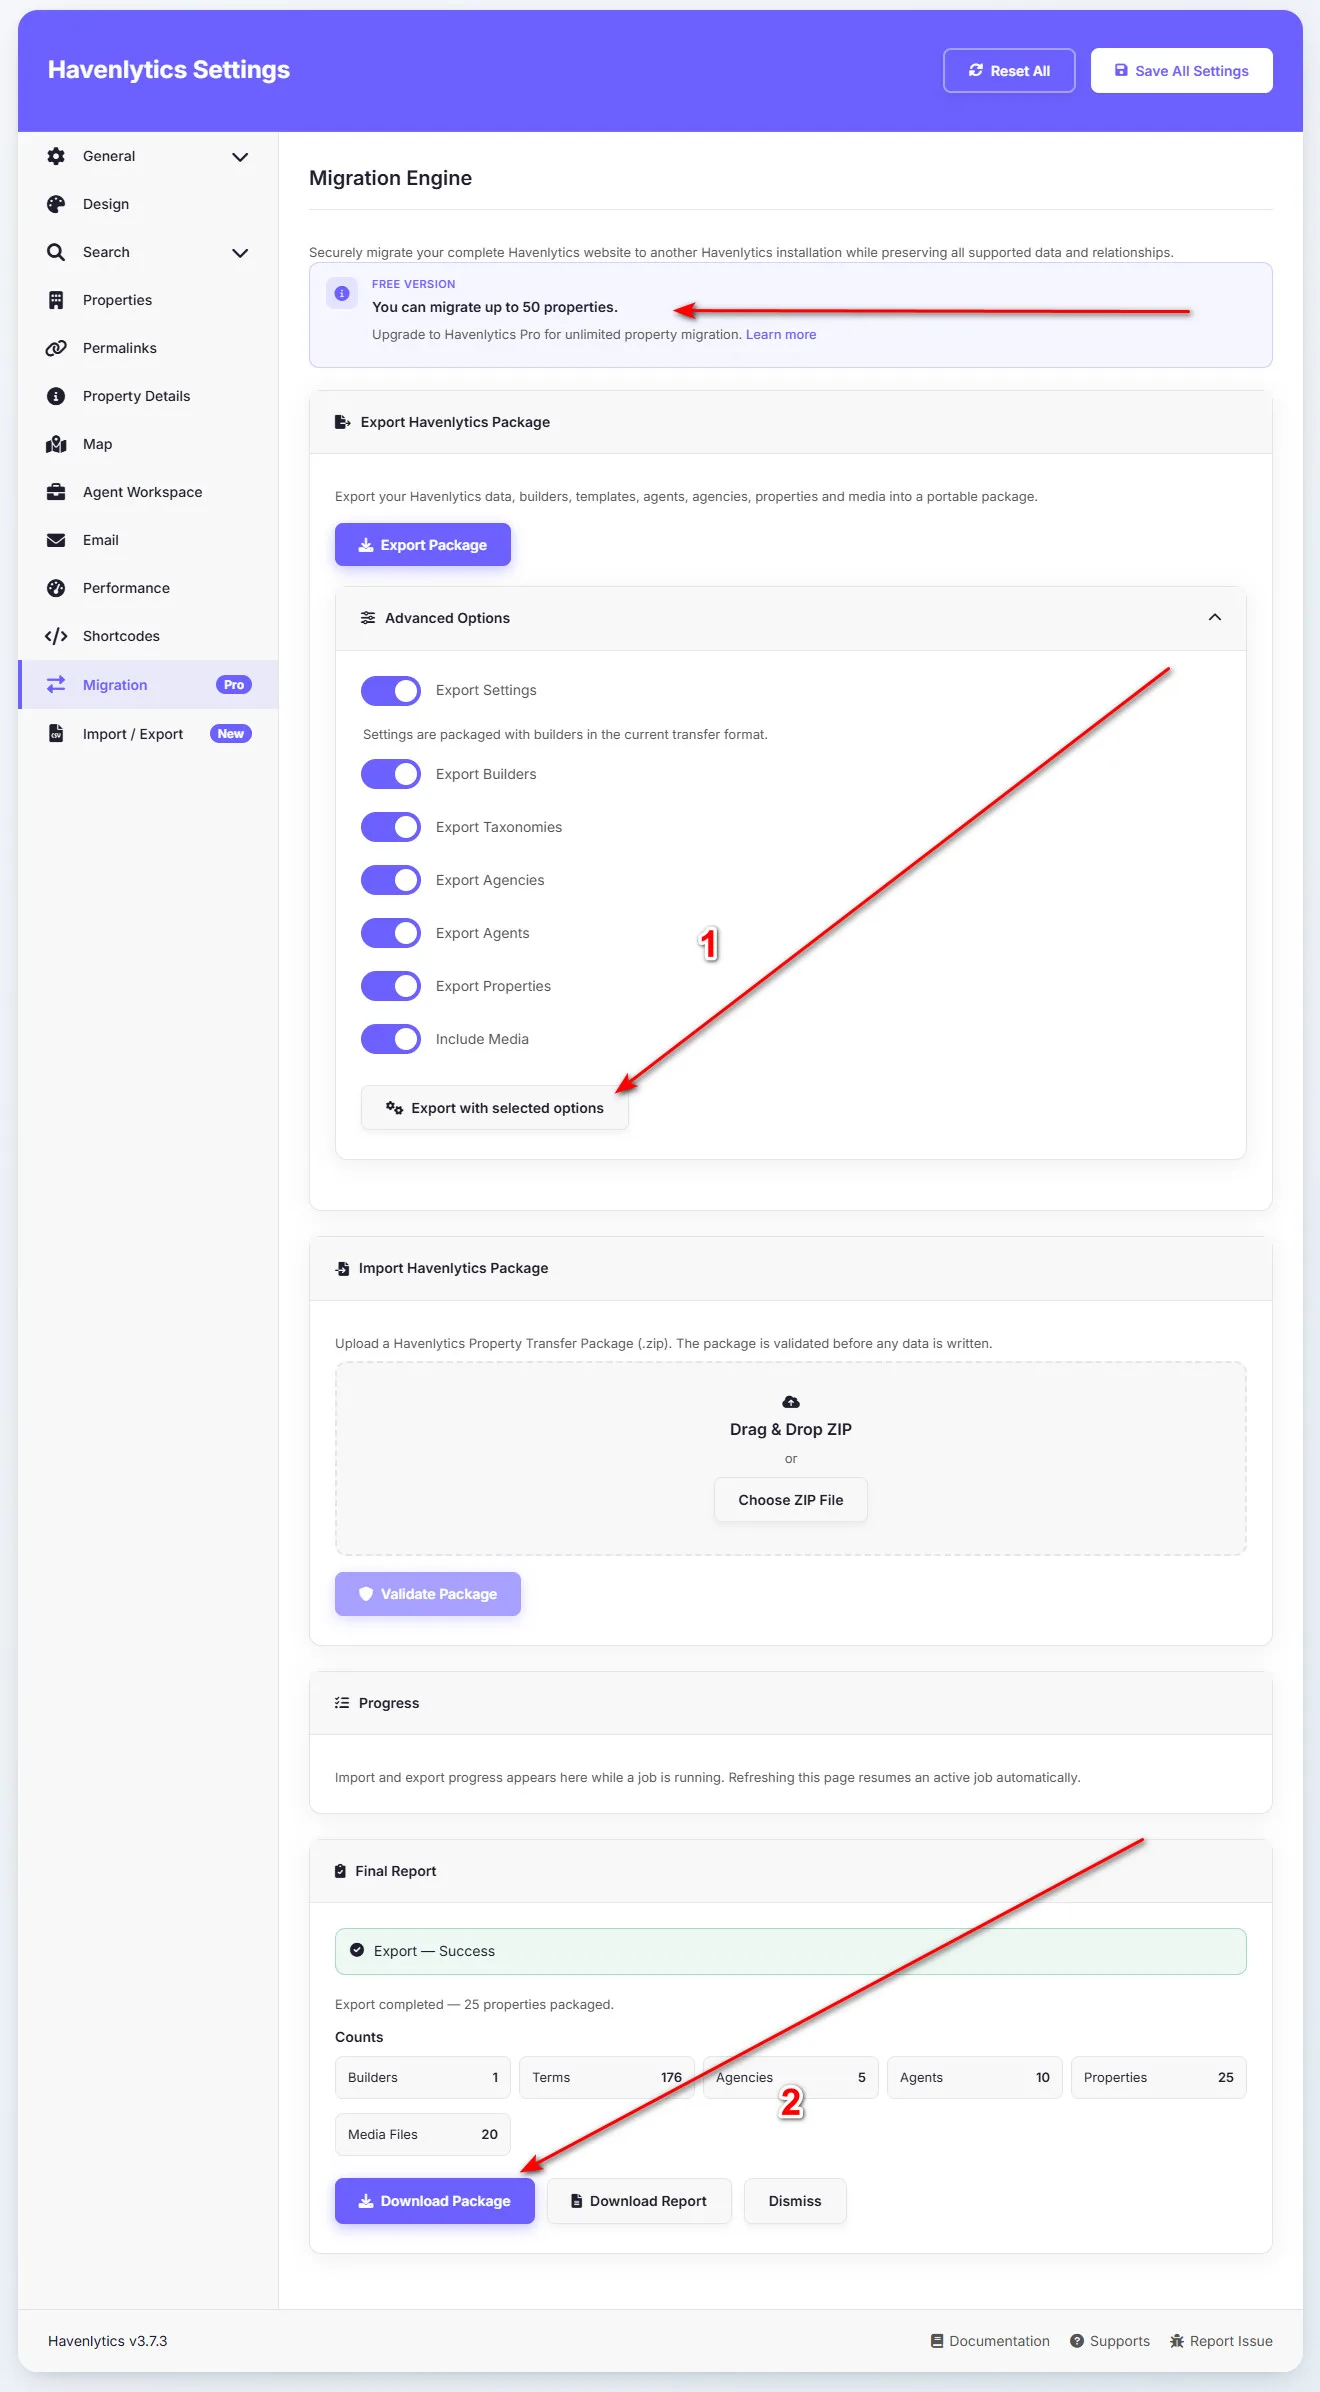
Open Havenlytics → Settings → Migration. In the Export Havenlytics Package section, you’ll see this description:
Export your Havenlytics data, builders, templates, agents, agencies, properties and media into a portable package.
- Click Export Package to create a complete package with everything included.
- If you only want to export certain items — for example, properties without agents, or without media — click Advanced Options to choose exactly what’s included.
- Wait for the job to finish in the Progress section.
- Once complete, download your package from the Final Report section.
💡 Tip: For your first migration, try a quick export without media. It’s faster and lets you confirm everything works before running the full transfer with photos included.
Step 2: Download and Save Your Package
Save the downloaded .zip file somewhere secure. Package files stored temporarily on the server are cleaned up automatically after a few hours, so download promptly after export finishes.
Step 3: Prepare the Destination Site
- Make sure Havenlytics is installed and active on the destination site.
- If this is a live site, take a full backup before continuing — importing can create or update content, and this can’t be automatically undone.
- Decide how duplicate content and Property Builder settings should be handled (covered in Step 5).
Step 4: Upload and Validate the Package
Go to Havenlytics → Settings → Migration on the destination site. In the Import Havenlytics Package section, you’ll see:
Upload a Havenlytics Property Transfer Package (.zip). The package is validated before any data is written.
- Drag and drop your
.zipfile into the upload area, or click Choose ZIP File. - Click Validate Package.
- Havenlytics checks the package and shows you a summary — including what it contains and any warnings — before anything is written to your site.
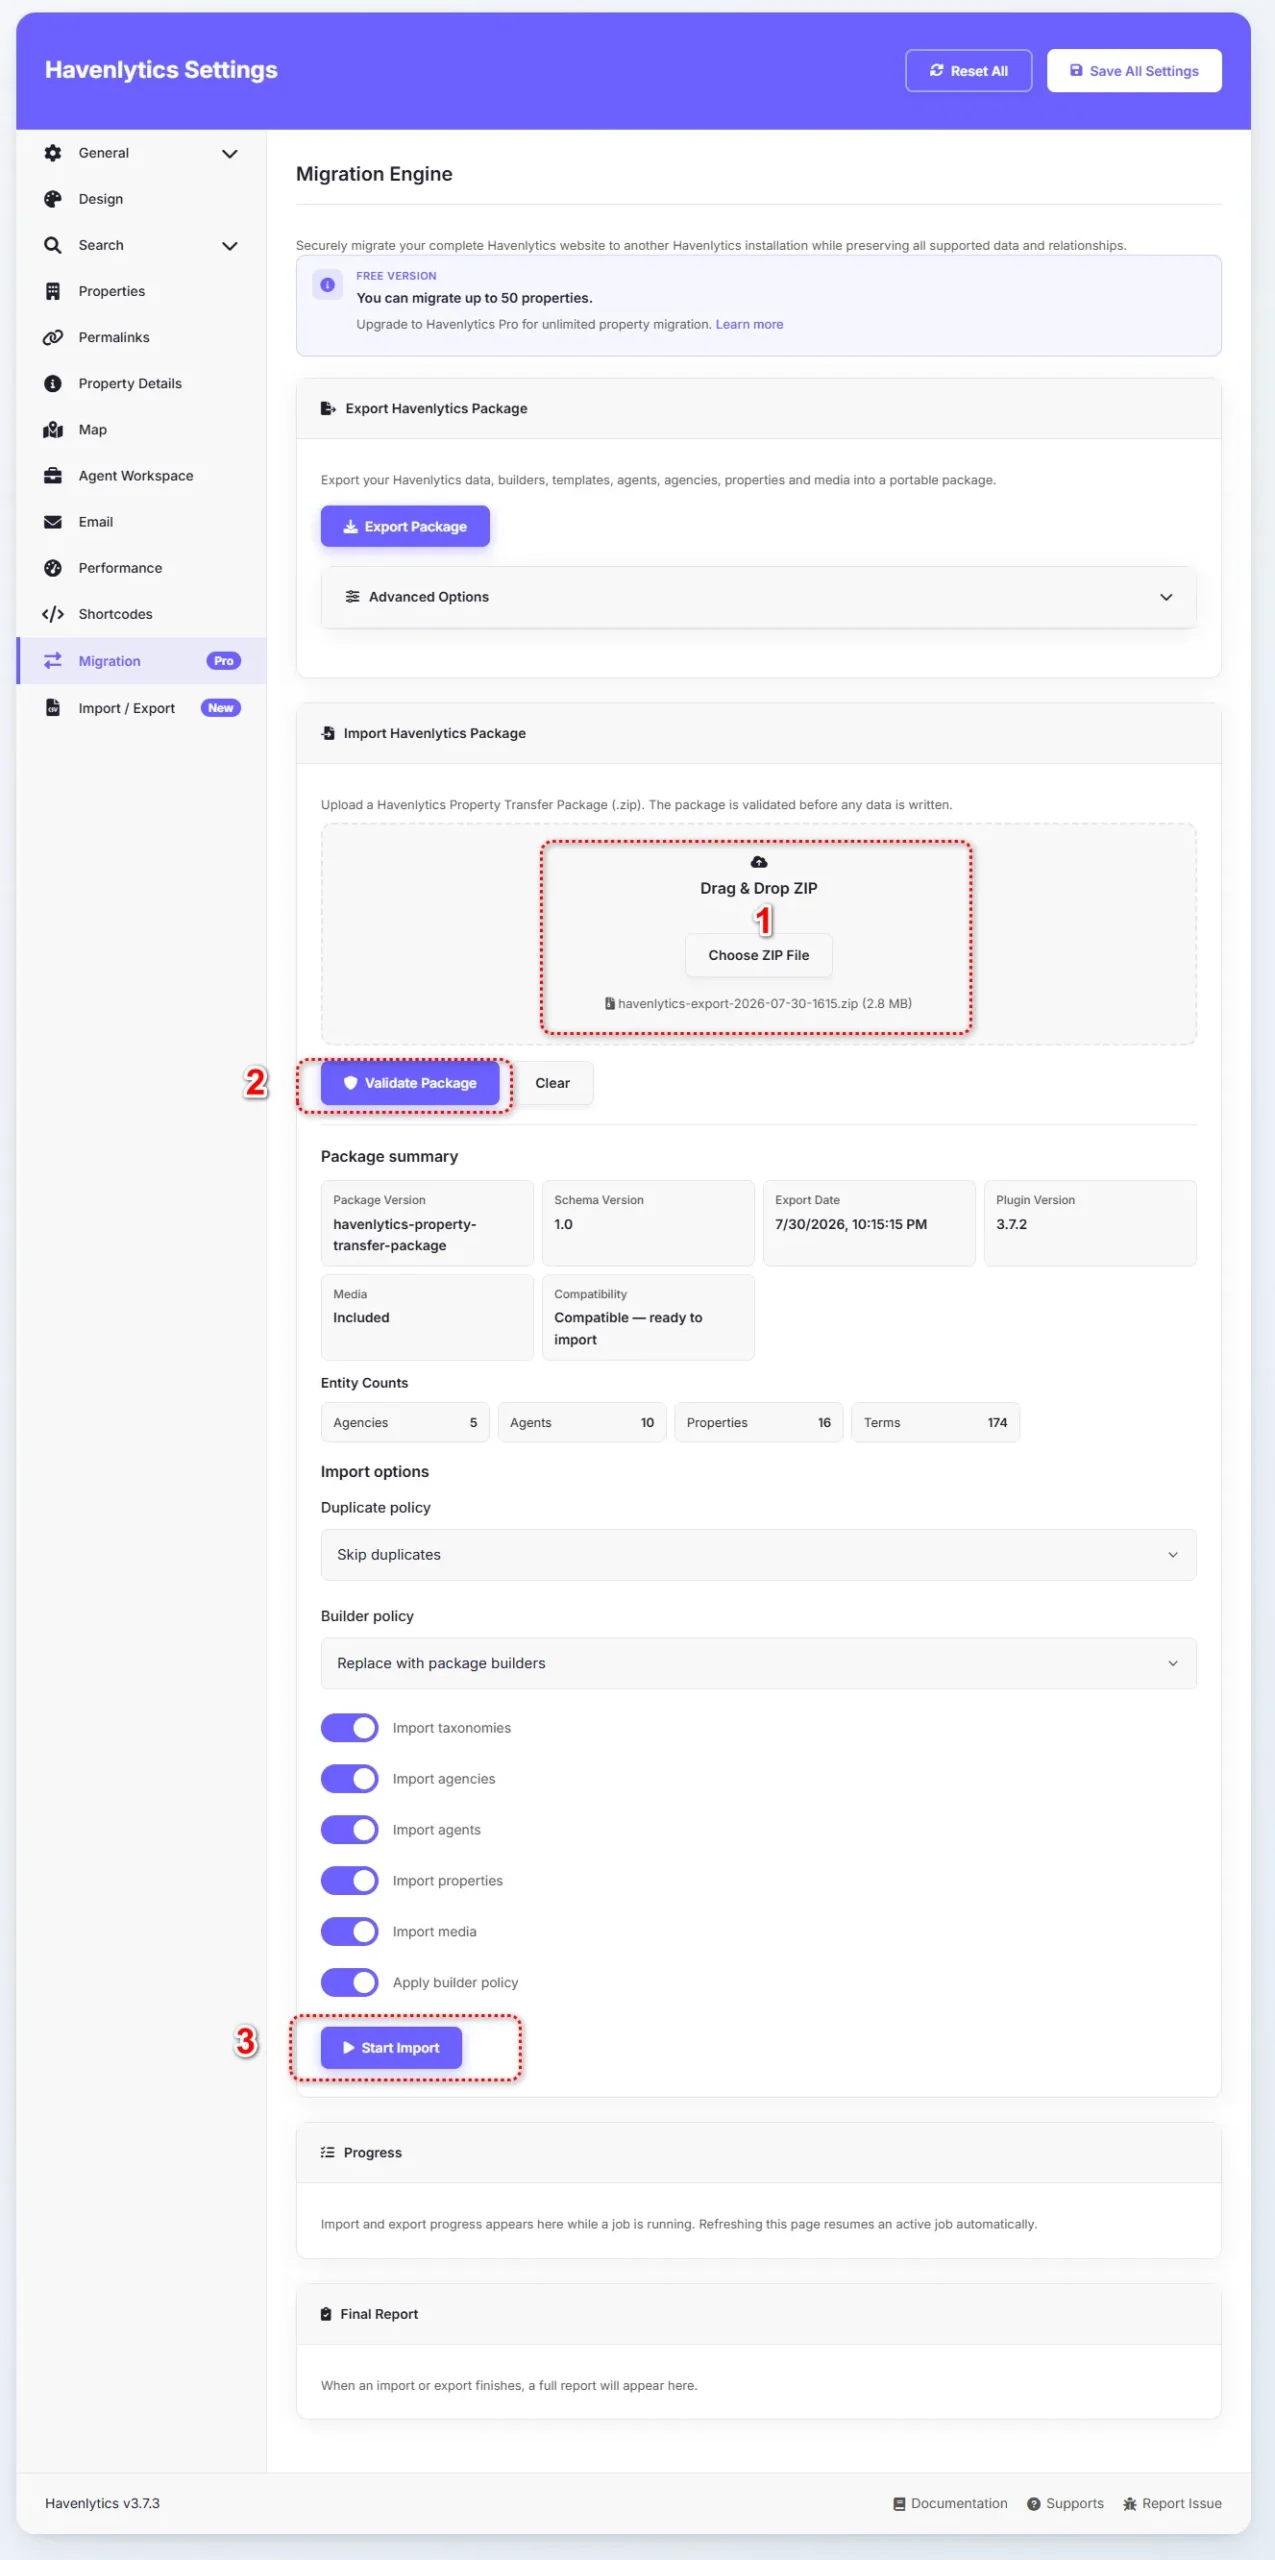
ℹ️ Note: The package is always validated first. Nothing is written to your destination site until validation succeeds and you confirm the import.
Step 5: Choose Your Import Settings
Before starting the import, choose how existing content should be handled:
| Option | What it does |
|---|---|
| Skip duplicates | Leaves existing matching content untouched |
| Update existing | Updates matching content with the new data |
| Overwrite | Replaces matching content more thoroughly |
| Create new | Always creates new content, even if similar content exists |
You’ll also choose a Builder policy:
- Keep destination builders – keeps the Property Builder and Card Builder setup already on this site.
- Replace with package builders – applies the builder setup from the package you’re importing.
💡 Tip: If you’re not sure, start with Skip duplicates and Keep destination builders. You can always run another import later with different settings.
Step 6: Start the Import
Click Start Import and confirm in the dialog that appears — this confirmation exists because import can create or update content on your site.
Step 7: Monitor Migration Progress
The Progress section shows live status while your export or import job is running:
Import and export progress appears here while a job is running. Refreshing this page resumes an active job automatically.
You don’t need to babysit the process, but keep the tab open until it finishes.
Step 8: Verify the Migration Results
Once a job completes, the Final Report section summarizes the results:
When an import or export finishes, a full report will appear here.
For imports, review how many items were created, updated, skipped, or had errors. Then:
- Visit a few property pages on the destination site.
- Test your search and filter options.
- Confirm agent profiles and photos display correctly.
- If URLs look broken, go to Settings → Permalinks and click Save Changes.
Tips
- Run a test migration on a staging site before doing the real transfer.
- Export without media first to confirm the structure is correct, then run a final export with media included.
- If you’re on the free plan, keep your property count at or under 50, or upgrade before migration day.
- Download your exported package right away — it isn’t stored permanently on the server.
- After importing, do a hard refresh (and clear any caching plugin) before checking your pages.
- Only one migration job can run at a time.
Common Mistakes
- Expecting the Migration Engine to import a spreadsheet or a competitor plugin’s export. It only works between two Havenlytics sites — use Import / Export for that instead.
- Forgetting to include media, then wondering why photos are missing after import.
- Skipping the backup step before importing into a live site.
- Not noticing the Free Version’s 50-property limit until export is blocked.
- Closing the browser tab mid-job and assuming it paused safely — keep the tab open until the Final Report appears.
Frequently Asked Questions
Can I migrate between two Havenlytics sites?
Yes — that’s exactly what the Migration Engine is built for.
Can I migrate only my properties, without agents or agencies?
Yes. Use Advanced Options on export and only enable the items you want.
Does the free version include the Migration Engine?
Yes, with a limit of up to 50 properties per transfer. Upgrade to Pro for unlimited migration.
Is the Migration Engine the same as CSV Import / Export?
No. The Migration Engine transfers a complete package between two Havenlytics sites. Import / Export is for CSV spreadsheets and other plugins.
Can I pause a migration and finish it later?
There’s no pause button, but if your browser refreshes while a job is still running, Havenlytics resumes automatically. Keep the tab open until it finishes.
What happens if I cancel a job partway through?
The current step stops, but some content may already have been written. Always check the Final Report after cancelling.
Troubleshooting
| Problem | What to try |
|---|---|
| Export Package button is disabled | Confirm your site has at least one property, and that you’re within the Free Version’s 50-property limit. |
| “Limit reached” message | Reduce your property count, or upgrade to Pro. |
| A job is already running | Wait for it to finish, or cancel it if it’s safe to do so. |
| Validate Package fails | Confirm you’re uploading a genuine Havenlytics package, not a renamed or edited file. Re-export if needed. |
| Can’t download the exported package | Log in as the same administrator account that started the export. |
| Photos are missing after import | Re-export with media included, and make sure media import is enabled on the destination. |
| Progress seems stuck | Keep the tab open and refresh — an active job resumes automatically. Check server disk space and time limits if it continues to stall. |