Import / Export lets you bring properties in from a CSV file, or export your properties to a CSV file. You can map each column your way, and save your mapping as a reusable profile for next time.
Download Demo CSV
Want to test CSV Import before using your own property data?
Download our official sample CSV file containing demo property listings. This file is ideal for learning how column mapping, validation, and importing work.
Download
📄 Download Havenlytics Demo.csv
After Download
- Open Havenlytics → Settings → Import / Export
- Select the Import tab
- Upload the demo CSV
- Map the columns
- Validate the data
- Start the import
💡 Tip: Use this sample CSV to familiarize yourself with Havenlytics before importing your own property listings.
Use Import / Export when you need to:
- Bring listings in from Excel, Google Sheets, or a CRM export
- Migrate listings from another real estate plugin that can export a CSV
- Bulk-update property fields from a spreadsheet
- Export your Havenlytics properties for editing, reporting, or re-import
Import / Export works with spreadsheet files. If you’re moving a full Havenlytics site — including agents, agencies, and Property Builder layouts — use the Migration Engine instead.
Import & Export Workflow
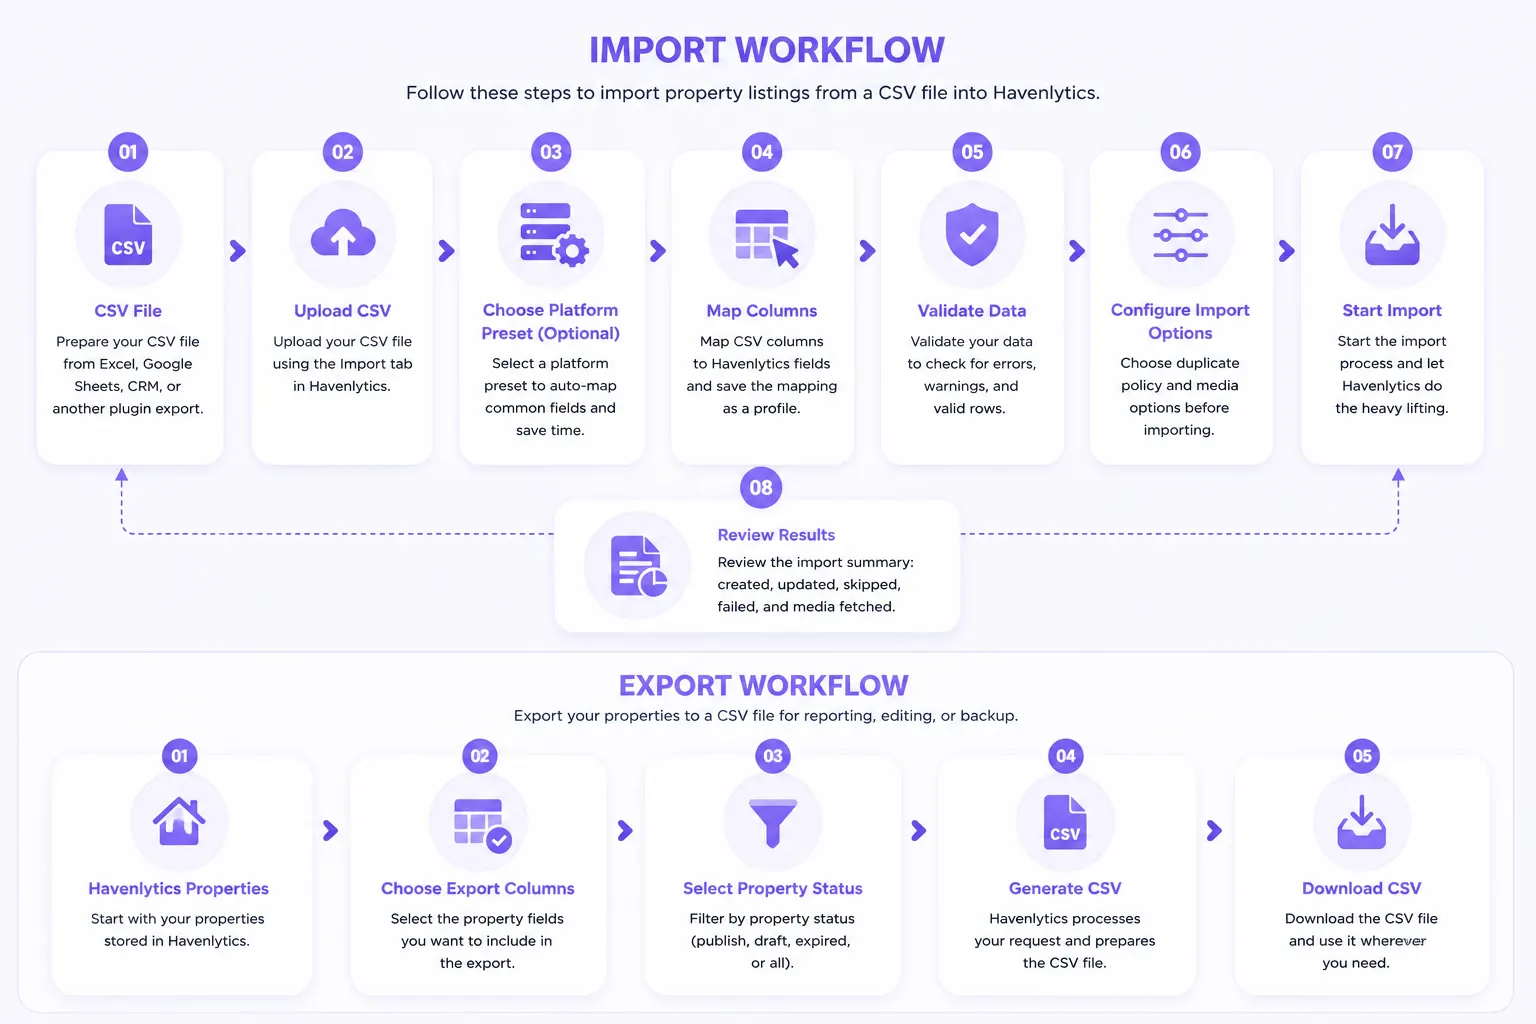
💡 Tip: Think of Import / Export as importing or exporting property data using CSV files, while the Migration Engine transfers an entire Havenlytics website using a ZIP package.
Open: Havenlytics → Settings → Import / Export. You’ll find three tabs: Import, Export, and Profiles.
When Should I Use Import / Export?
Use Import / Export when you want to:
- Import property listings from Excel or Google Sheets.
- Import listings from another real estate plugin.
- Bulk update existing properties.
- Export property listings for reporting or editing.
- Transfer property data using CSV files.
Do not use Import / Export when moving an entire Havenlytics website.
For complete website transfers, use the Migration Engine.
Supported File Format
Supported
- ✅ CSV (.csv)
Not Supported
- ❌ Excel (.xlsx)
- ❌ Excel (.xls)
- ❌ Apple Numbers
- ❌ JSON
Before You Begin
- You’ll need administrator access.
- Have a CSV file ready (UTF-8 recommended). Havenlytics doesn’t accept native Excel
.xlsxfiles directly — save or export as CSV first. - Take a backup of your site if you plan to update existing listings.
- Know whether new rows should skip, update, or replace anything that already exists.
- If you want photos to download automatically, make sure the image URLs in your CSV are publicly reachable.
ℹ️ Note: Need sample data instead of your own file? Havenlytics includes a complete Property Onboarding Wizard that imports fully configured demo properties with galleries, maps, documents, videos, agents, taxonomies, and custom fields. Use the Onboarding Wizard to explore Havenlytics’s full property structure — Import / Export is for bringing in your own data.
Before Importing
For the best results:
- Remove empty rows from your CSV.
- Save the file using UTF-8 encoding.
- Ensure your column names are clear.
- Test with a small sample before importing a large dataset.
Step-by-Step Guide
Importing a CSV happens in five steps: Upload → Map Columns → Validate → Import → Complete.
Step 1: Upload Your CSV
On the Import tab:
- Read the intro: “Upload a CSV export from your previous property plugin (or any spreadsheet). You will map its columns to Havenlytics fields on the next step.”
- Under Choose Your Previous Platform (Optional), select the platform your CSV came from. Havenlytics will automatically pre-map common fields to save you time — you can still review and adjust every mapping afterward.
- Drag and drop your CSV file into the upload area, or click Choose CSV File.
- Click Upload & Continue.
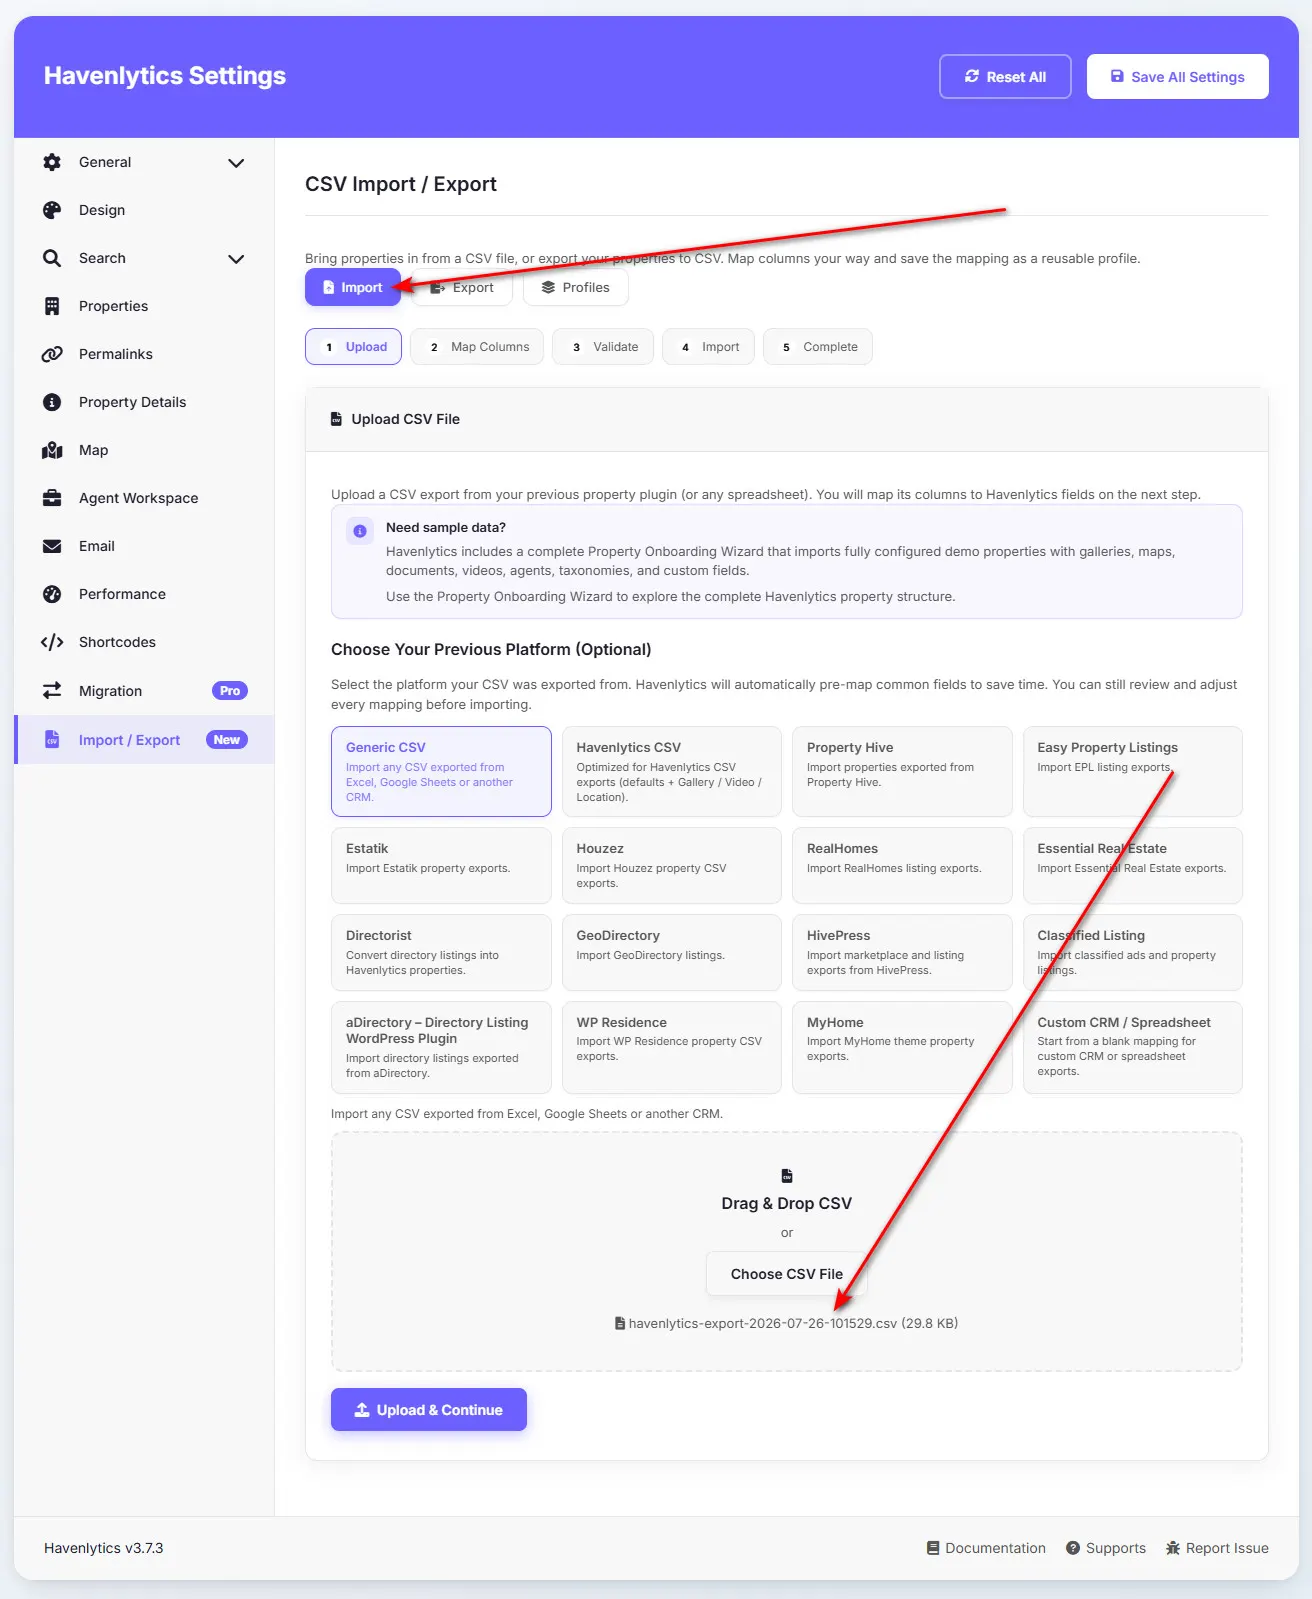
Available platform presets:
| Platform | Best for |
|---|---|
| Generic CSV | Any CSV exported from Excel, Google Sheets, or another CRM |
| Havenlytics CSV | Files exported from Havenlytics itself (includes Gallery, Video, and Location defaults) |
| Property Hive | Property Hive exports |
| Easy Property Listings | EPL listing exports |
| Estatik | Estatik property exports |
| Houzez | Houzez property CSV exports |
| RealHomes | RealHomes listing exports |
| Essential Real Estate | Essential Real Estate exports |
| Directorist | Converting directory listings into Havenlytics properties |
| GeoDirectory | GeoDirectory listings |
| HivePress | HivePress marketplace and listing exports |
| Classified Listing | Classified ads and property listings |
| aDirectory – Directory Listing WordPress Plugin | aDirectory listing exports |
| WP Residence | WP Residence property CSV exports |
| MyHome | MyHome theme property exports |
| Custom CRM / Spreadsheet | A blank starting mapping for your own CRM or spreadsheet format |
💡 Tip: If you’re unsure which preset to choose, start with Generic CSV or Custom CRM / Spreadsheet — you can map every column manually.
Step 2: Map Columns
On this step, match each column from your CSV to a Havenlytics field:
- CSV Column — the header from your file
- Sample Value — an example value, so you can confirm you’re mapping the right field
- Maps To — the Havenlytics field it should fill, or — Do not import —
If you chose a platform preset, many columns will already be mapped. Review each one and adjust anything that doesn’t look right.
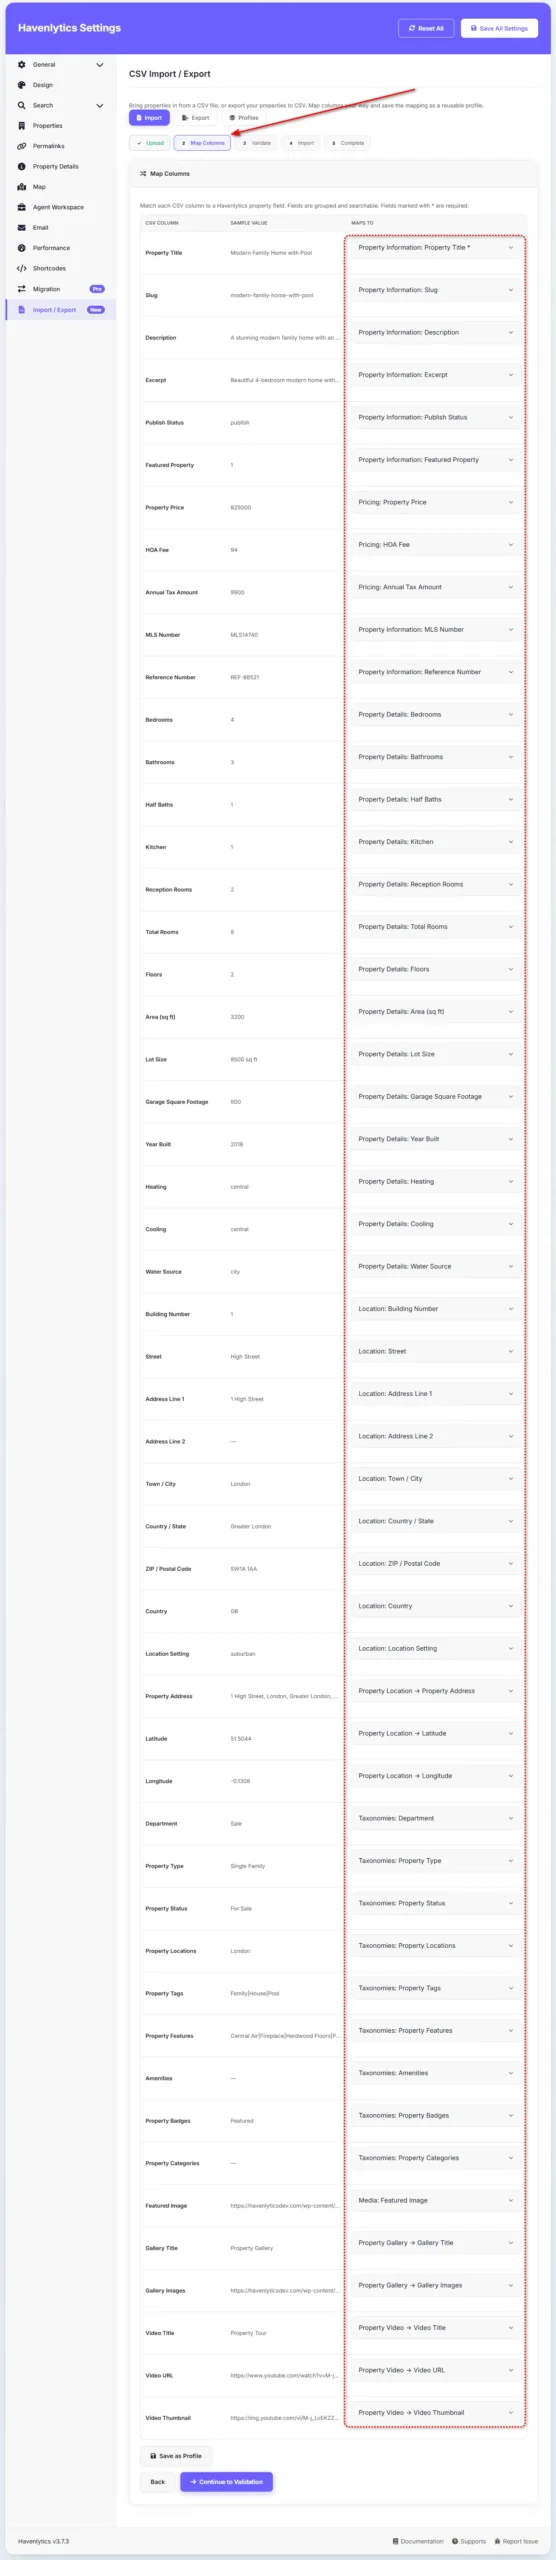
What to map:
- Title is essential — without it, rows commonly fail or create poor listings.
- MLS and/or Reference are strongly recommended, since they’re used for matching duplicates.
- Everything else (price, taxonomies, media URLs, and more) is optional — map only what you trust.
Once you’re happy with the mapping, click Save as Profile to reuse it next time, then continue to Validate.
Step 3: Validate
Havenlytics samples your file and reports:
- Total rows found
- Rows sampled
- Valid rows
- Errors and warnings
Review any errors before continuing — common issues include missing titles or unreadable image URLs.
Then configure your import options:
Duplicate policy (matched by MLS, Reference, or Title)
| Option | Behavior |
|---|---|
| Skip duplicates | Leaves existing matches untouched |
| Update existing | Updates matched properties with your CSV values |
| Replace existing | Replaces matched properties more thoroughly |
Media options
- Download featured image, gallery, and document URLs into the Media Library
- Use the first gallery image as the featured image when none is mapped
⚠ Warning: Only enable media downloads for URLs you trust and that are publicly reachable.
Step 4: Import
Click Start Import. The import runs in the background — keep the tab open until it finishes. If you refresh the page while it’s running, the job resumes automatically.
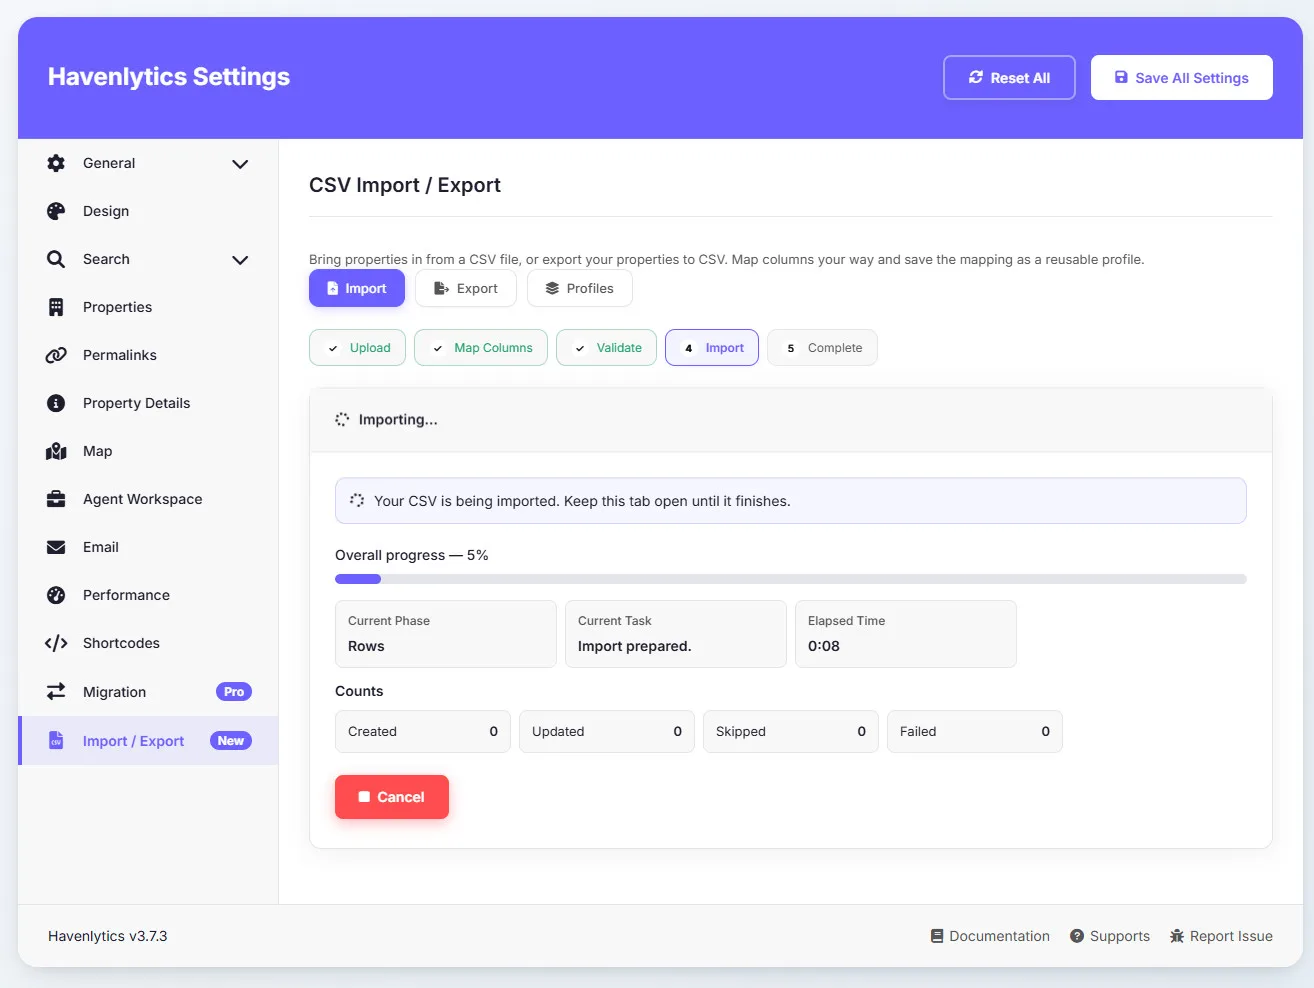
Step 5: Complete
Once the import finishes, you’ll see a summary of:
- Created
- Updated
- Skipped
- Failed
- Media fetched (if media download was enabled)
From here you can click Import Another CSV, or head to Havenlytics → Properties to review your listings.
After importing:
- Confirm your property count matches what you expected.
- Open a few listings and check titles, prices, and taxonomies.
- Check featured images and galleries if media download was enabled.
- View a property on the frontend (hard-refresh if you use a caching plugin).
- If URLs look broken, go to Settings → Permalinks and click Save Changes.
Exporting Properties to CSV
Switch to the Export tab to create a CSV of your existing listings.
- Choose which columns to include — by default, all supported fields are selected.
- Choose which property statuses to include (Published, Draft, Pending, Private, Expired are selected by default).
- Click Start Export.
- Once the job finishes, click Download CSV.
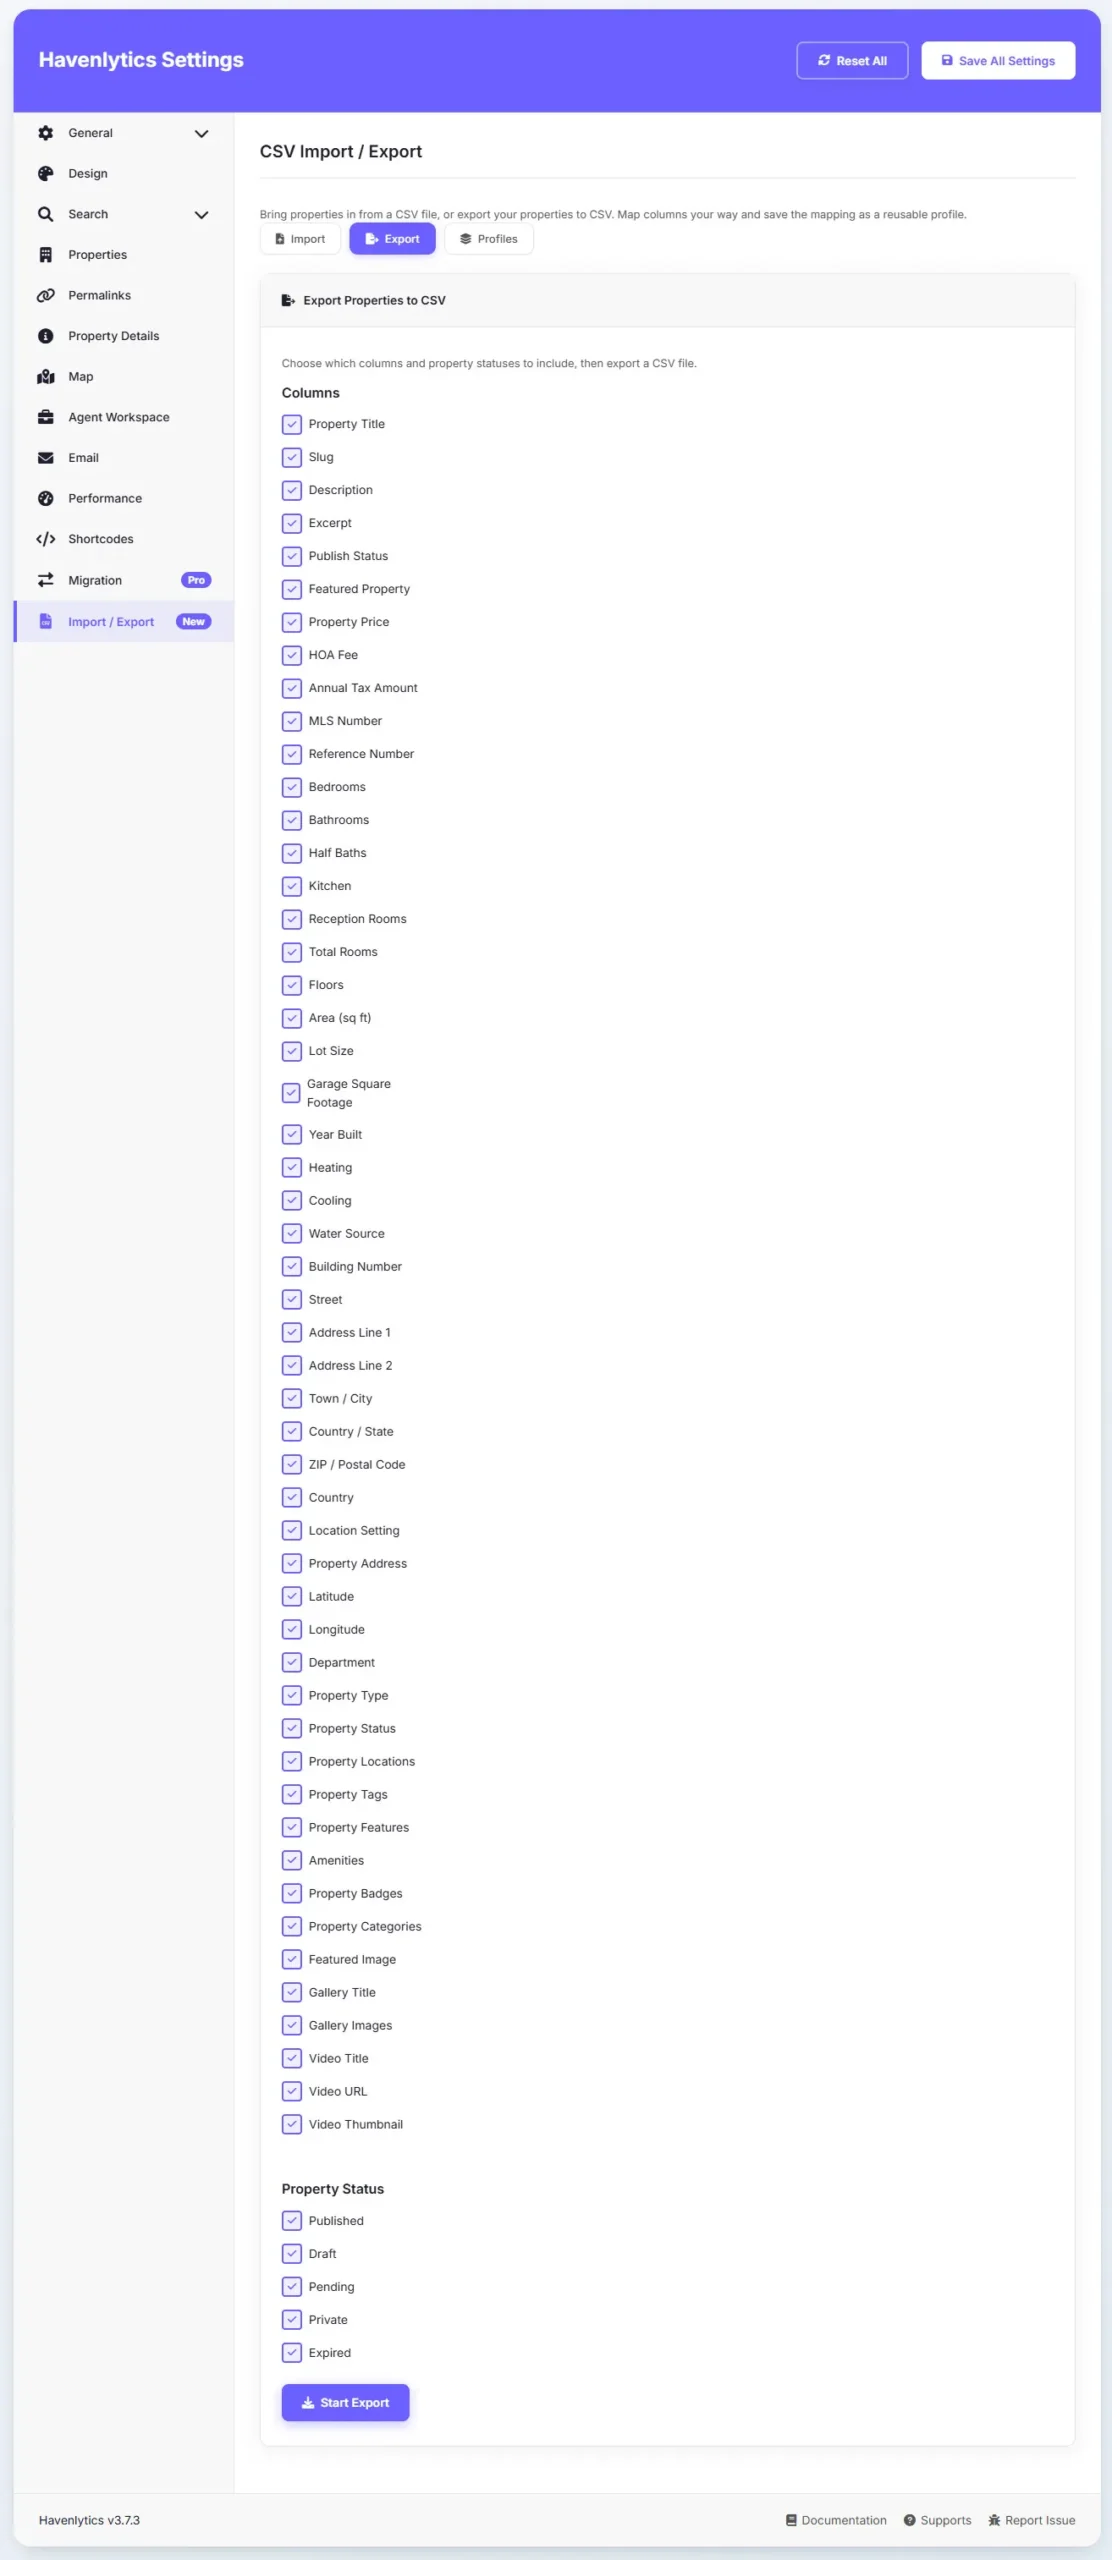
💡 Tip: Export is filtered by status and columns — it isn’t a way to export a hand-picked list of properties from the Properties screen. If you need a specific subset, adjust the status filters or trim rows afterward in your spreadsheet.
Common uses for an exported CSV:
- Create reports in Excel or Google Sheets.
- Bulk edit property information.
- Share listings with partners.
- Archive property data.
- Prepare listings for another website.
ℹ️ Note: CSV export focuses on property fields. Agents and Property Builder layouts aren’t part of the CSV catalog — use the Migration Engine if you need those.
Managing Mapping Profiles
Switch to the Profiles tab to manage saved mappings.
- Save as Profile during Map Columns to reuse a mapping for future imports.
- Load saved mapping on a new import to apply a profile you saved earlier.
- From the Profiles tab you can refresh the list, export a profile as JSON, import a profile from JSON, or delete profiles you no longer need.
💡 Tip: Name profiles after the source system — for example, “Houzez – Agency A” — rather than “final” or “new.” This keeps things clear if you manage more than one feed.
⚠ Warning: Deleting a profile can’t be undone unless you’ve exported it as JSON first.
Tips
- Start with a small 5–10 row sample file before running a full import.
- Save a UTF-8 CSV to avoid corrupted characters.
- Keep the browser tab open during Upload, Import, and Export — refreshing simply resumes an active job.
- Only one CSV job can run at a time.
- Use the Havenlytics CSV preset when re-importing a file you originally exported from Havenlytics.
Common Mistakes
- Uploading a native Excel
.xlsxfile instead of a CSV — save/export as CSV first. - Skipping the Map Columns review after choosing a platform preset — always double-check Sample Value against Maps To.
- Leaving media downloads on for untrusted URLs.
- Not mapping MLS or Reference, then finding duplicate policies don’t match rows the way you expected.
- Forgetting a backup before running an import with Update existing or Replace existing.
Frequently Asked Questions
Can I import an Excel file directly?
No — save or export it as a CSV first, then upload the CSV.
Can I import from Google Sheets?
Yes. In Google Sheets, go to File → Download → Comma-separated values (.csv), then upload that file.
What if my previous plugin isn’t in the platform list?
Choose Generic CSV or Custom CRM / Spreadsheet, map the columns manually, and save a profile for next time.
Can I reuse my column mappings?
Yes — save them as a profile during Map Columns, then load that profile on future imports from the Profiles tab.
Is there a property limit on CSV import or export?
No. The 50-property limit applies only to the Migration Engine, not to Import / Export.
Can I export just my published listings?
Yes — on the Export tab, leave only Published checked under property statuses.
Troubleshooting
| Problem | What to try |
|---|---|
| Upload & Continue stays disabled | Choose a CSV file first — the button activates once a file is selected. |
| Many mapping fields are blank | Try a different platform preset, or map the remaining columns manually. |
| Validation errors on every row | Check your CSV’s encoding (use UTF-8) and confirm it uses commas, not semicolons. |
| Duplicates keep appearing | Standardize your MLS/Reference values, and use Skip duplicates or Update existing as appropriate. |
| Images aren’t importing | Confirm the image column is mapped and media download is enabled; check that URLs are public and reachable. |
| Export CSV is empty | Check your status filters, and confirm the site has properties matching them. |
| A job seems stuck | Keep the tab open and refresh — an active job resumes automatically. |