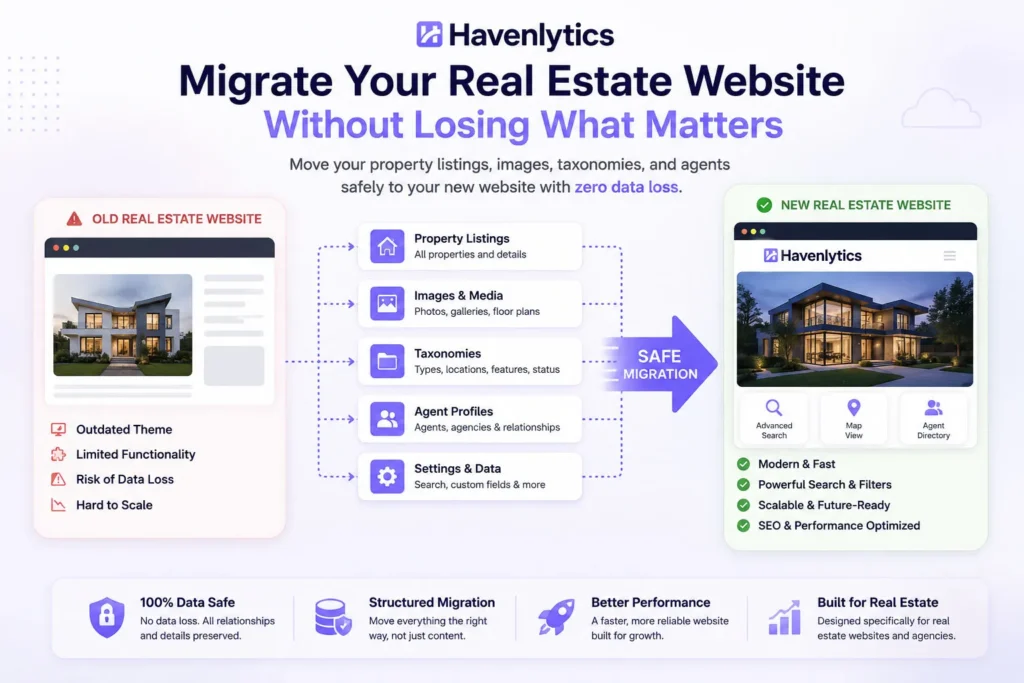
Migrating a real estate website is not like migrating a blog.
A blog migration mostly means moving posts and images — content that stands on its own. A real estate website migration means moving a system: listings with dozens of structured fields, taxonomies that power search, agent profiles tied to specific properties, media libraries with hundreds or thousands of images, and URLs that search engines have spent years learning to trust. Get any one piece wrong, and the damage isn’t cosmetic — it’s missing listings, broken search, or rankings that quietly evaporate over the following weeks.
This guide is the complete, honest version of how to do it right: what actually needs to move, what tends to go wrong, and how to plan a migration that preserves everything your current site has built. If you’re moving away from a theme-bundled real estate setup, Real Estate Theme vs Plugin explains why that migration is often necessary in the first place; this article is the practical follow-through.
We use Havenlytics as the working example throughout, and we’ll be precise about what its Migration Engine actually does — no more, no less.
Why Real Estate Website Migration Is Different
Most migration advice on the web is written for generic WordPress sites, and generic advice underestimates what a real estate site is carrying.
A typical blog migration checklist covers posts, pages, and maybe a plugin or two. A real estate site adds an entire layer that checklist doesn’t anticipate: listings that are really structured records (price, location, status, bedrooms, features — not just a title and body text), taxonomies that define how search and filtering work, agents who are tied to specific listings and need to stay tied to them, and image galleries where a single property might carry twenty or more photos that all need to arrive intact and in order.
Miss the structure, and you don’t just lose content — you lose function. A listing that migrates as a plain post, with its price and bedroom count flattened into a paragraph of text, is no longer searchable, filterable, or comparable to the rest of your inventory. That’s the core risk this entire guide is built around avoiding.
What Needs to Be Migrated
Before planning anything, it helps to have the complete list in front of you. A real estate website migration needs to account for:
- Listings — every field, not just the title and description
- Images and media — full galleries, in the right order, at usable resolution
- Taxonomies — property types, statuses, locations, and features, correctly reassigned
- Agent and agency data — profiles, bios, contact details, and which listings belong to whom
- URLs — so existing links, bookmarks, and search rankings aren’t broken
- Search configuration — filters that reflect the taxonomy structure once it’s rebuilt on the new system
Treat this as a checklist, not a suggestion. A migration that successfully moves listings but drops agent assignments, or moves images but loses their order, is a migration with visible, embarrassing gaps — the kind visitors notice before you do.
Common Migration Risks
Understanding what typically goes wrong is the fastest way to plan around it.
Data flattening. The most common failure: structured fields (price, bedrooms, status) get imported as unstructured text because the source and destination don’t map field-to-field. The listing looks fine at a glance and is quietly useless for search.
Broken taxonomy relationships. Listings arrive, but their property type, location, or feature tags don’t carry over correctly — so search results are incomplete even though the listings technically exist.
Image loss or disorder. Galleries import with missing photos, wrong ordering, or images so heavily compressed by the transfer process that they’re no longer usable.
Orphaned agent assignments. Listings migrate without their agent connection, leaving properties with no clear point of contact — a problem that’s invisible in an admin dashboard and very visible to a confused visitor.
URL structure changes. If listing URLs change format during migration and old URLs aren’t redirected, every external link, bookmark, and search engine ranking pointing to the old URL breaks.
No rollback plan. A migration that goes wrong with no backup to fall back to turns a fixable problem into a serious one.
Every section that follows exists to address one of these risks directly.
Planning Before Migration
The single biggest predictor of a smooth migration is the planning done before it starts.
Begin with an honest inventory: how many listings, how many images, how many agents, and — importantly — how clean is the current data? A migration is also a natural moment to notice long-standing problems (inconsistent statuses, missing taxonomy assignments) that are much easier to fix in the source system than after they’ve been carried over.
Set expectations around timing. Larger inventories and larger media libraries take longer to move and verify, and rushing verification is where risk concentrates. Plan for a period where the old and new systems can coexist, so nothing goes live until it’s actually been checked.
Finally, decide who’s responsible for what — data migration, image handling, URL mapping, and post-migration testing are different tasks, and a small mistake in any one of them can undo the value of doing the other three well.
Backup Strategy
Before moving anything, back up the source site completely — database and media files both, not just one or the other. This isn’t a formality; it’s the single thing that turns a migration mistake into a five-minute fix instead of a crisis.
A sound backup approach for a real estate migration specifically:
- Take a full backup immediately before migration begins, and confirm it’s restorable, not just present.
- Keep the backup accessible throughout the migration and testing period — don’t archive it somewhere hard to reach until you’re confident the new site is fully verified.
- If your hosting or current plugin supports it, export your listing data separately as well (a CSV export, where available), as a second, independent copy of your core inventory data.
- Don’t decommission the old site or its hosting until the new site has been fully tested against the checklist later in this guide.
The backup step takes the least time of anything in this guide and prevents the most damage. Treat it as non-negotiable.
Migrating Listings
Listing migration is the core of the project, and the goal is precise: every field from the old listing should map to the correct field on the new system, not just arrive as generic content.
Price should remain a price field, not text folded into a description. Status should remain a selectable status, not a word buried in a paragraph. Bedrooms, bathrooms, size, and location need the same treatment. If a listing’s structured data doesn’t survive the move intact, none of the search and filtering functionality covered in Property Search That Converts will work correctly for that listing once it’s live.
This is precisely the problem the Havenlytics Migration Engine is built to address: it moves existing property data into Havenlytics’ structure, rather than requiring listings to be recreated by hand or re-entered as plain content. If you’re moving from a spreadsheet-based inventory instead of another platform, CSV import serves the equivalent purpose for that source — we’ll cover CSV workflows in more depth in an upcoming dedicated guide.
Whichever route applies to your situation, verify a sample of migrated listings field-by-field before assuming the whole batch is correct. A mapping error that affects one field usually affects every listing that went through the same process.
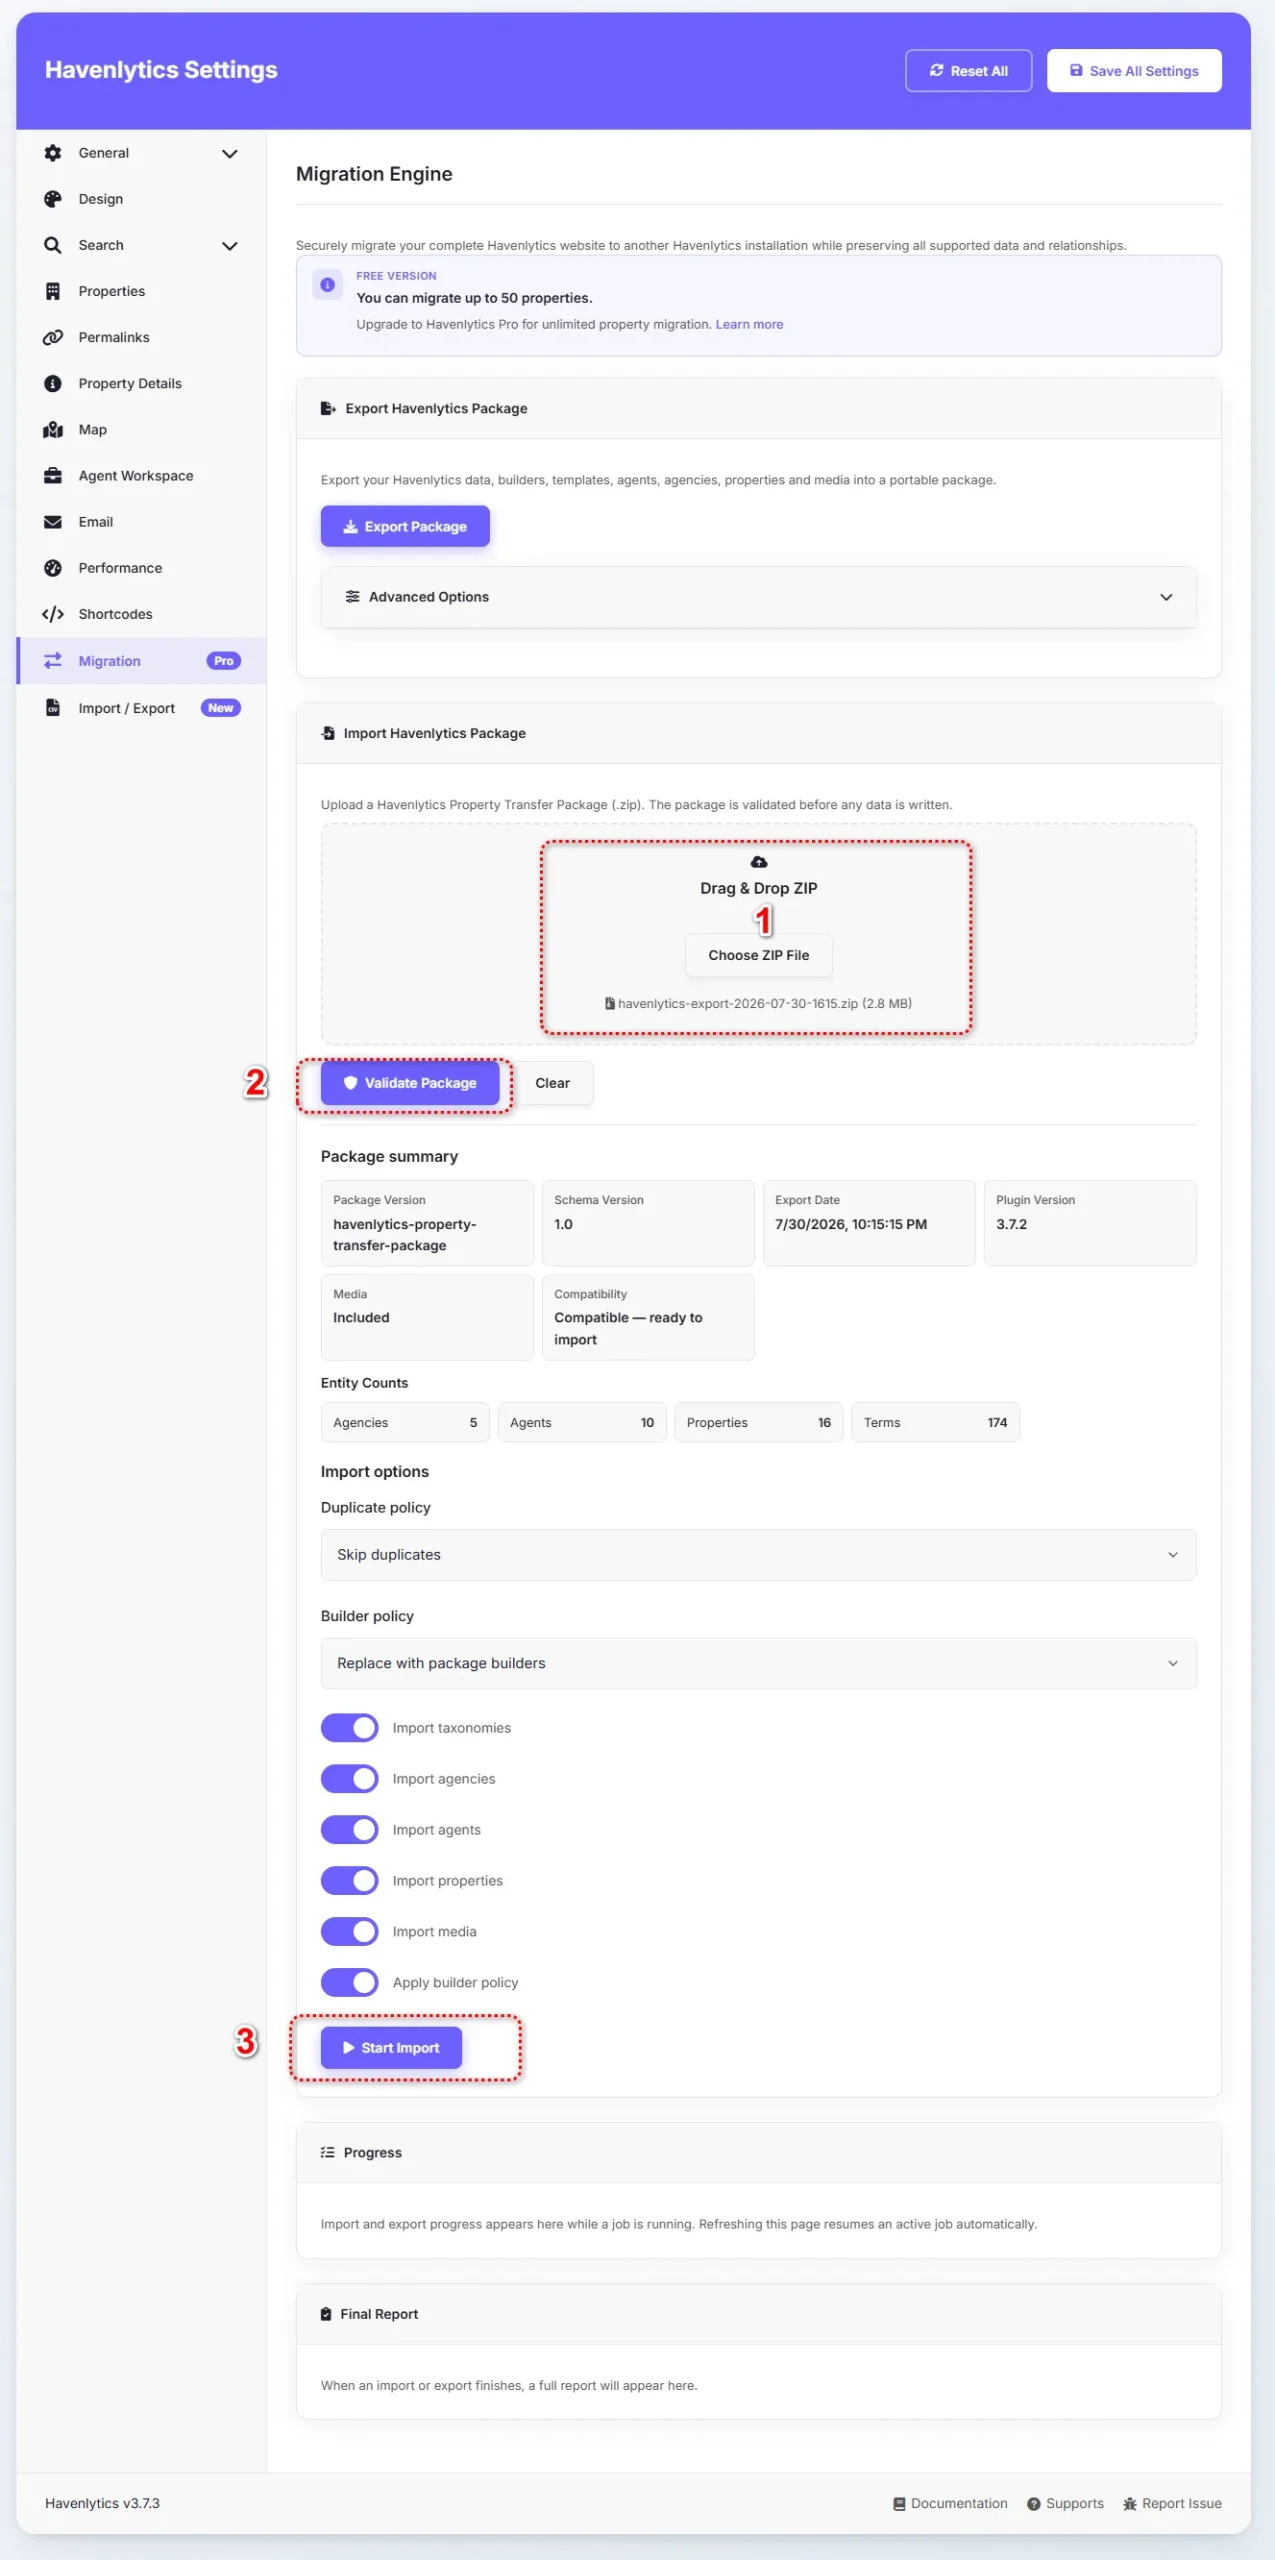
Download Havenlytics Demo Migration Package.zip
Migrating Images & Media
Images carry more of a listing’s persuasive power than any other element, which makes image migration worth extra care.
Confirm that full galleries transfer — not just a single featured image — and that photo order is preserved, since the lead image typically carries the most weight. Check image quality after the move; some migration processes compress images more aggressively than the original hosting did, and a listing with degraded photos undersells a property that looked fine on the old site.
It’s also worth using a migration as an opportunity to clean up media that shouldn’t come along for the ride — outdated photos from sold properties, duplicates, or images that were never properly attached to a listing in the first place. A fresh media library is easier to keep organized than one that inherited years of accumulated clutter.
Migrating Taxonomies
Taxonomies are the part of a migration most likely to be underestimated, because a listing can visibly “work” even when its taxonomy data is broken — it just won’t show up correctly in search.
The goal is for property type, status, location, and feature taxonomies to carry over as structured relationships, not as plain labels sitting in a description. If your source site’s location taxonomy was, for example, a flat list of city names, decide whether your new site’s structure should mirror that exactly or improve on it — a migration is a natural opportunity to refine a taxonomy structure that grew organically and inconsistently over time, as covered in our guide to organizing listings with taxonomies.
After migration, the practical test is simple: pick several taxonomy values (a property type, a location) and confirm that filtering by them on the new site returns the listings you’d expect. If it doesn’t, the taxonomy relationships didn’t survive the move correctly, even if the listings themselves look fine.
Migrating Agents & Agencies
Listings without a clear owner are one of the most visible signs of an incomplete migration, so agent data deserves the same care as listing data.
Each agent’s profile — name, photo, bio, contact details — needs to move along with their listing assignments intact, so that every migrated property still shows the correct point of contact. For agencies, the structure connecting agents to the agency itself needs to carry over too, not just the individual profiles in isolation.
Verify this the same way you’d verify listings: spot-check a sample of agents after migration and confirm their assigned listings match what they had on the old site. An agent who’s lost half their listings in the move won’t necessarily notice until a client asks about a property that’s no longer showing under their name.
Preserving URLs and SEO
This is where a technically successful migration can still cause real damage if it’s skipped or rushed.
Search engines and external sites have links pointing at your existing URLs. If your listing URLs change format on the new site — a different structure for property pages, a different pattern for search or location pages — every one of those existing links breaks unless it’s redirected to the new equivalent.
The standard, reliable approach: before migrating, export a full list of your current site’s important URLs (listing pages, location pages, key content). After migration, set up redirects — typically 301 redirects — from each old URL to its new equivalent. This is a standard WordPress practice, handled through your hosting configuration or a dedicated redirect plugin, and it’s worth treating as a required step rather than an optional cleanup task.
Two related habits protect your search visibility further: keep your XML sitemap updated and resubmitted after migration, so search engines can find the new structure quickly, and monitor your search console tools in the weeks after launch for a spike in errors, which usually signals a redirect gap you missed.
None of this is unique to real estate — it’s standard migration practice for any WordPress site — but the stakes are higher here because listing pages tend to carry meaningful organic traffic that took real time to earn.
Testing After Migration
Before announcing anything, work through a structured test pass rather than trusting that “it looks fine.”
- Spot-check a representative sample of listings — not just the first few — for complete, correctly mapped fields
- Confirm image galleries are complete, correctly ordered, and reasonable quality
- Test search and filtering against taxonomy values you know should return specific listings
- Confirm every checked listing shows the correct assigned agent
- Test a sample of old URLs to confirm redirects are working
- Check that maps and location-based features display listings correctly
- Review the site on mobile, not just desktop
- Keep the old site’s backup accessible until this entire checklist passes
Testing takes real time, and it’s tempting to rush it after a migration that already felt like a long project. Resist that — this checklist is what catches the gap between “the migration technically completed” and “the site actually works.”
How Havenlytics Migration Engine Works
To be precise about what’s confirmed: the Migration Engine exists to move existing property data into Havenlytics’ structure, so that switching to the platform doesn’t mean re-entering your inventory by hand. Combined with CSV import for spreadsheet-based data, it covers the two most common starting points site owners are migrating from.
What it does not do — and what this guide has been careful to describe as your responsibility rather than an automated feature — is handle URL redirects, third-party plugin-specific data formats not covered by its supported import methods, or design decisions about how your new taxonomy structure should be organized. Those remain planning and configuration steps, covered throughout this guide, that sit alongside the Migration Engine rather than inside it.
If you’re evaluating a migration and want to understand exactly what data the Migration Engine currently supports moving, the migration documentation has the authoritative, up-to-date reference — check it before finalizing your migration plan, since supported import sources and fields are the kind of detail worth confirming directly rather than assuming.
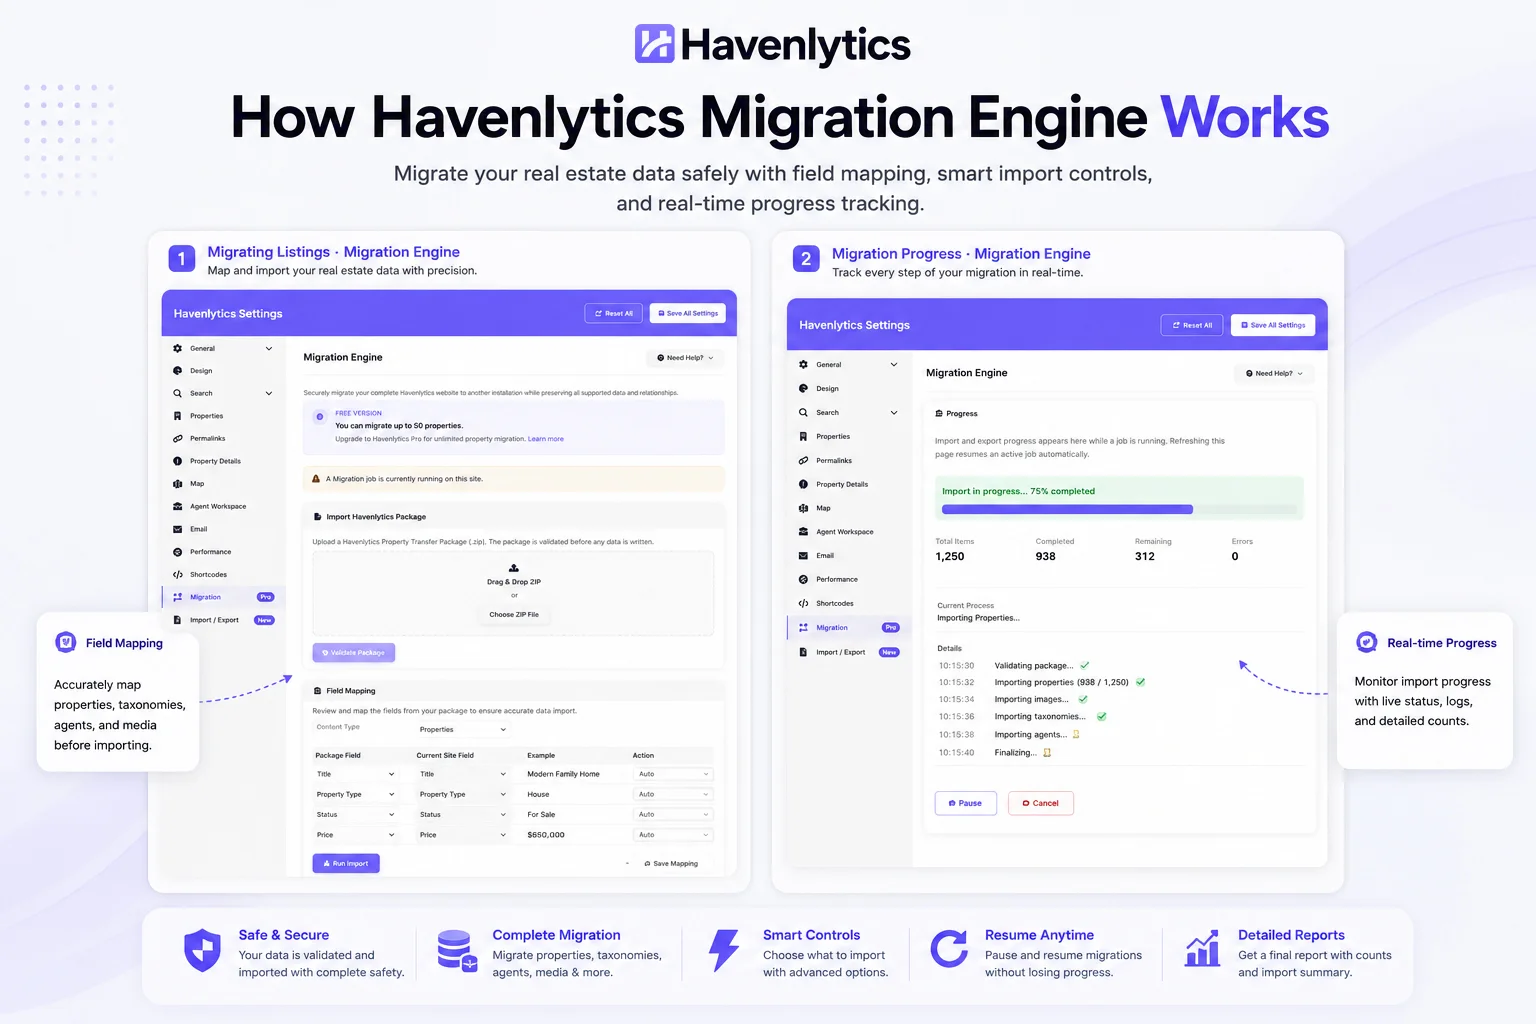
See how the Havenlytics Migration Engine securely transfers property listings, taxonomies, agents, media, and settings between WordPress websites with real-time progress tracking and validation.
Common Migration Mistakes
- Migrating without a tested backup. The single riskiest shortcut in this entire process.
- Trusting a migration without spot-checking the data. A batch process can complete successfully and still contain mapping errors that only show up on inspection.
- Forgetting redirects. Technically excellent data migration, undone by weeks of broken links and lost search rankings because URLs weren’t mapped.
- Migrating taxonomy labels as text instead of structured relationships. Listings that look complete but don’t actually filter or search correctly.
- Decommissioning the old site too early. Once the old site and its backup are gone, any gap discovered later has no source of truth to recover from.
- Skipping the mobile review. A migration that looks correct on a desktop testing pass can still have display issues that only surface on smaller screens.
Planning your migration?
Download our free demo migration package or follow the complete Migration Engine documentation to safely move your real estate website to Havenlytics.
Conclusion
A real estate website migration succeeds or fails on the details most visitors will never consciously notice — whether a price field stayed a price field, whether an agent’s listings stayed attached to their profile, whether an old bookmark still finds its way to the right page. None of it is complicated in isolation. All of it needs to be done deliberately, checked carefully, and never rushed past the testing phase.
Plan before you move anything, back up completely, migrate listings and their structure together rather than as flattened content, and verify with real spot-checks rather than a glance. Do that, and a migration becomes what it should be: a platform change your visitors never notice happened.
If you’re planning a migration, try the Migration Engine against a test batch of your listings first, or read the migration documentation for the current supported sources and fields. And once your data has safely arrived, the natural next step is making sure people can still find it: our guide on Property Search That Converts covers how to configure search against your newly migrated taxonomy structure.
FAQ
What data is most at risk during a real estate website migration?
Structured listing fields (price, status, bedrooms) and taxonomy relationships (property type, location, features) are the most commonly lost or damaged, because they can silently degrade into plain text during a poorly mapped migration while the listing still appears to “work” at a glance.
Will I lose my search rankings if I migrate my real estate website?
Not if URLs are handled correctly. The main risk to rankings is broken links from old URLs that were never redirected to their new equivalents. Setting up 301 redirects for your key pages before and immediately after migration is the standard way to prevent this.
Can Havenlytics migrate listings from another real estate plugin or theme?
The Migration Engine is built to move existing property data into Havenlytics’ structure, and CSV import covers spreadsheet-based inventory. For the current list of specifically supported sources and data formats, check the migration documentation directly, since supported imports are the kind of detail that’s best confirmed there rather than assumed.
How long does a real estate website migration take?
It depends on the size of your inventory and media library, and rushing the testing phase is the biggest risk to a migration’s timeline, not the data transfer itself. Planning for a period where old and new sites coexist, with time for thorough testing before going live, is more important than optimizing for speed.
Do I need a developer to migrate a real estate website?
Not necessarily — much of the process described in this guide (backups, using the Migration Engine or CSV import, testing) doesn’t require code. A developer becomes more valuable for complex custom URL redirect mapping or unusual source data structures, but a straightforward migration is within reach for a non-technical site owner who follows a careful process.
What should I test first after completing a migration?
Start with a representative sample of listings checked field-by-field, then confirm search and filtering return correct results for known taxonomy values, then verify agent assignments and a sample of redirected URLs. Those four checks catch the majority of migration problems before visitors ever encounter them.